Sending logs using Fluentd to Graylog
I was given the task to figure out sending logs received by fluentd to a Graylog server. By the end of this post, what we’ll have is a client-server fluentd setup. That is, a fluentd instance will receive logs (client side) and will send it to a server side fluentd instance. This server side fluentd will send hese logs to Graylog. Let’s get started!
Graylog
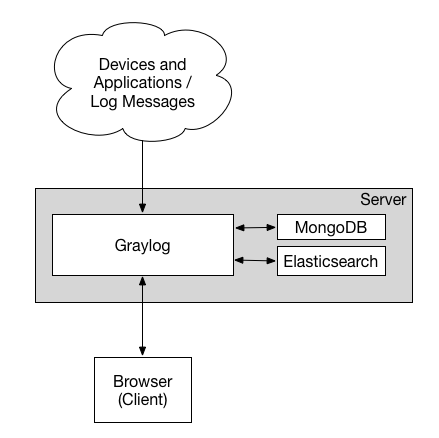
Graylog is a platform that is used for log management. It has the ability to receive logs from various services and sources, and it gives a web interface to visualize and run queries on the collected logs. It makes use of Elasticsearch and MongoDB. Below is a diagram from their docs that explains the basic working:
To setup Graylog on my system, I made a quick Docker Compose file:
version: "3"
services:
  mongo:
    image: mongo:3
  elasticsearch:
    image: docker.elastic.co/elasticsearch/elasticsearch-oss:6.8.10
    environment:
      - http.host=0.0.0.0
      - ES_JAVA_OPTS=-Xms512m -Xmx512m
  graylog:
    image: graylog/graylog:3.3
    environment:
      - GRAYLOG_HTTP_EXTERNAL_URI=http://127.0.0.1:9000/
    links:
      - elasticsearch
      - mongo
    ports:
      - 9000:9000
      - 12201:12201
      - 12201:12201/udp
      - 1514:1514
This sets up Graylog along with MongoDB and Elasticsearch. Place this docker-compose.yml file in a directory of your choice (graylog for instance), and run docker-compose up to get your Graylog setup up and running. It will take a while to start so give it time. (This assumes you have docker and docker-compose installed)
To confirm that it is up and running, go to 127.0.0.1:9000 and you should see the graylog interace. Enter admin as the username and password to login.

Once you log in, go to System -> Inputs. We will be adding a new input so that graylog listens for logs from the location and port we tell it to. In the Select Input dropdown, select GELF UDP. GELF stands for Graylog Extended Log Format and is a log format that Graylog uses which takes care of a lot of shortcomings that other formats might have. We will be listening for GELF logs via UDP. Click on Launch new input
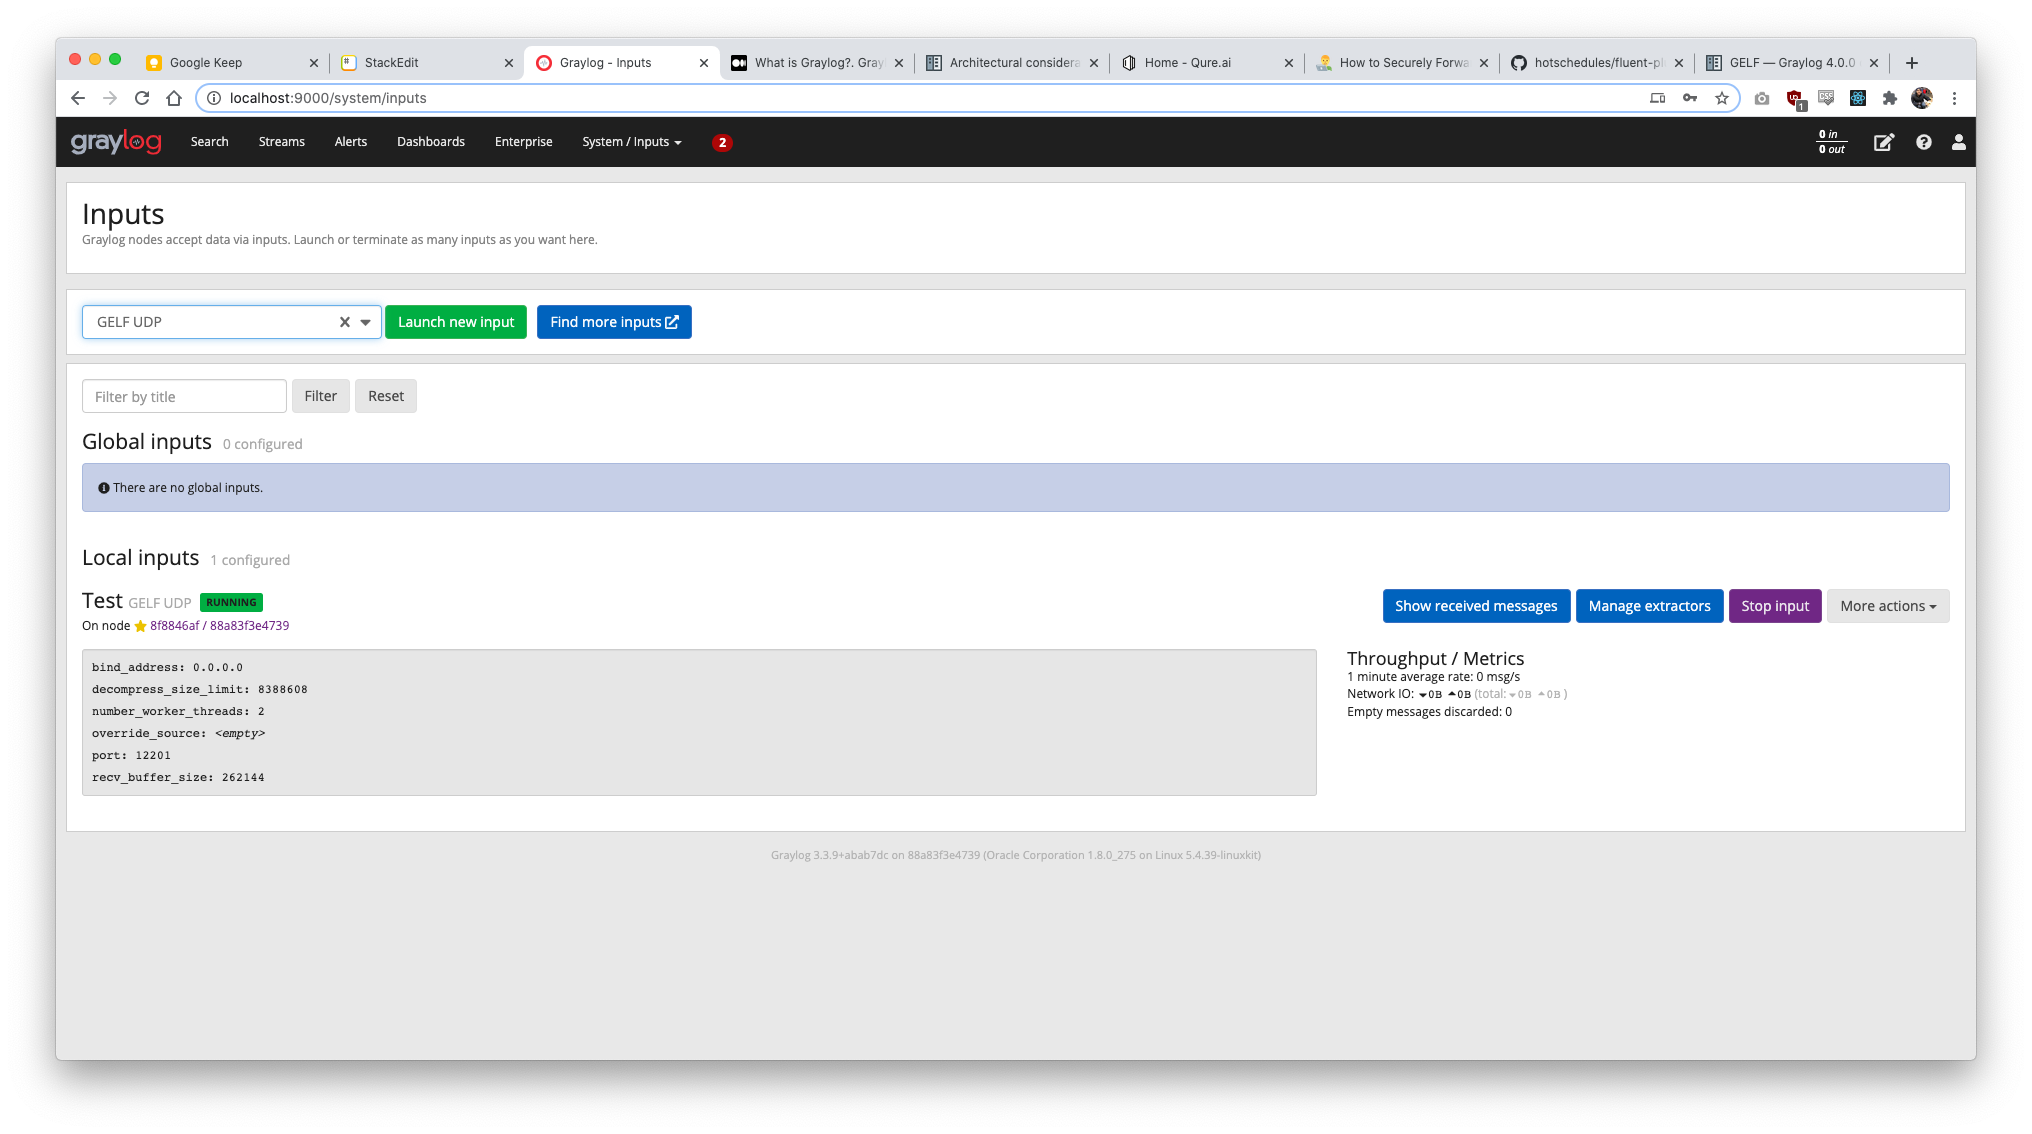
A modal will open, select the first node in the Node dropdown, and then enter a name you wish to. Make sure the bind address is 0.0.0.0 and port is 12201. You can leave the other settings as is. Click on Save, and we’re done with the Graylog setup for now.
Fluentd
Once this is set up, let’s look at how to setup fluentd. To get started with fluentd and get it working with encryption and authentication, Sasank has a great post on how to get this set up here. Refer to it to get your fluentd setup and come back here.
Assuming you have followed Sasank’s post, you now have a fluentd setup where one fluentd instance (client) is receiving a message from our python file and is sending that message to another instance (server). This server as of now is simply listening for messages on port 24224 and printing them. Let’s change this so that the server forwards this to our Graylog server.
For our server fluentd instance to forward logs to graylog, we need to install a plugin called fluent-plugin-gelf-hs. This is so that we can send GELF formatted logs to Graylog. However there’s a slight problem here. We can’t use the usual fluentd image since it won’t have the plugin installed. To fix this, let’s create our own Dockerfile to install the plugin. The contents of the Dockerfile are:
FROM fluent/fluentd:v1.11-1

# Use root account to use apk
USER root

RUN apk add --no-cache --update --virtual .build-deps \
        sudo build-base ruby-dev \
 && sudo gem install fluent-plugin-gelf-hs \
 && sudo gem sources --clear-all \
 && apk del .build-deps \
 && rm -rf /tmp/* /var/tmp/* /usr/lib/ruby/gems/*/cache/*.gem

COPY server_fluentd.conf /fluentd/etc/

USER fluent
Once this is done, run docker build -t fluentd-custom . to create an image named fluentd-custom. We will be using this image instead of fluent/fluentd. If you have followed Sasank’s post to set up fluentd, update your docker-compose.yml to use this new image. Here is what the file will look like:
version: "3"
services:
  clientfluent:
    image: fluent/fluentd
    volumes:
      - ./client_fluentd.conf:/fluentd/etc/fluent.conf
      - ./fluentd.crt:/etc/certs/fluentd.crt
    ports:
      - 24224:24224
  serverfluent:
    image: custom-fluentd
    volumes:
      - ./server_fluentd.conf:/fluentd/etc/fluent.conf
      - ./fluentd.crt:/etc/certs/fluentd.crt
      - ./fluentd.key:/etc/certs/fluentd.key
Now we will have to make changes to the server’s config (server_fluentd.conf) to tell it to send GELF logs to the host machine’s address (that is, where Graylog is running) on port 12201.
Let’s change the server config’s <match *.*> to add this:
<match *.*>
  @type copy
  <store>
    @type gelf
    host host.docker.internal
    port 12201
  </store>
  <store>
    @type stdout
  </store>
</match>
As you can see, we have added a new type @type gelf. The host destination is host.docker.internal, which is basically the address of the host machine (for linux systems, you will haver to look at other methods to get the host machine’s address). If your Graylog server is set up elsewhere, you’ll use that IP instead. The port 12201 is the same as the one we entered in Graylog for the input. Once this is done, we’re all good to go!
Making it all work.
Start Graylog
Start your graylog server by running docker-compose up wherever the docker-compose.ymlfile is.
Start fluentd
Start your fluentd setup by running docker-compose up in your fluentd directory.
Once that is done, we will use the test_fluent.py file from Sasank’s post, but make a tiny change. We will also add a message to the log being sent.
from fluent import sender
logger = sender.FluentSender('app', host='localhost', port=24224)
logger.emit('follow', {'from': 'userA', 'to': 'userB', 'message': 'this is a test'})
Now, we will run this file so that the client fluentd instance receives these and send it to the server fluentd instance.
$ fluentd % python test_fluent.py
$ fluentd % python test_fluent.py
$ fluentd % python test_fluent.pym #Im running it multiple times so that multiple logs are received. you could also add a loop in the file itself
Now if you look at the server instance, it will receive the logs (after a slight delay) and print them out
clientfluent_1  | 2020-12-02 10:37:19.000000000 +0000 app.follow: {"from":"userA","to":"userB","message":"this is a test"}
clientfluent_1  | 2020-12-02 10:37:20.000000000 +0000 app.follow: {"from":"userA","to":"userB","message":"this is a test"}
clientfluent_1  | 2020-12-02 10:37:20.000000000 +0000 app.follow: {"from":"userA","to":"userB","message":"this is a test"}
serverfluent_1  | 2020-12-02 10:37:19.000000000 +0000 app.follow: {"from":"userA","to":"userB","message":"this is a test"}
serverfluent_1  | 2020-12-02 10:37:20.000000000 +0000 app.follow: {"from":"userA","to":"userB","message":"this is a test"}
serverfluent_1  | 2020-12-02 10:37:20.000000000 +0000 app.follow: {"from":"userA","to":"userB","message":"this is a test"}
Awesome, the server fluentd is receiving the logs just fine. Now, let’s check if Graylog is receiving them. Go to Search in Graylog.
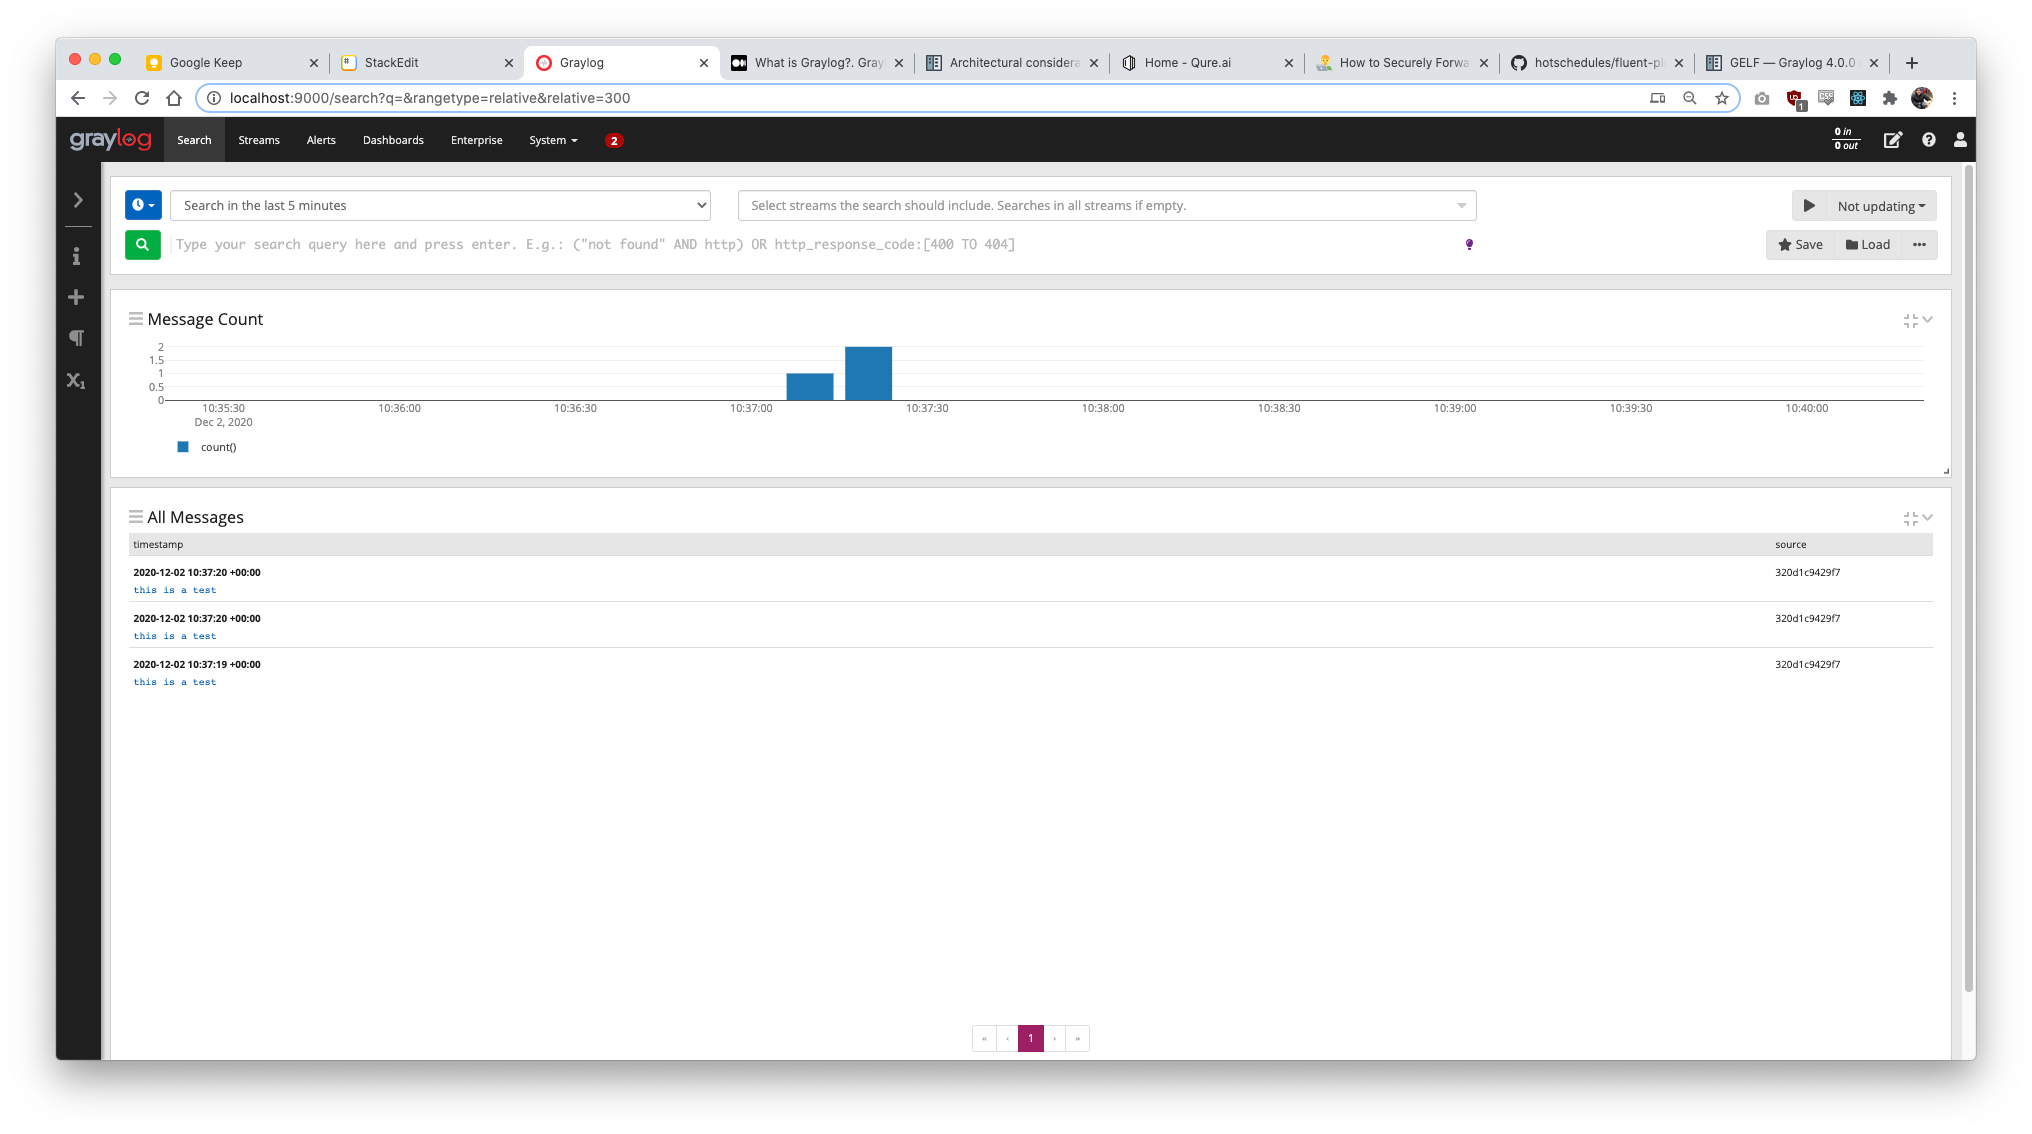
Voila! As you can see, it has received all 3 logs that we had sent! You can confirm this with the timestamps too, the fluentd server receiving time and the timestamp in Graylog will be the same.
So there it is! You have a nice little setup of a client sending logs to a server, which then sends the logs to a graylog server.